Guide to upgrading your Roller Shutter Controls
Roller shutter controls are the interface between the user and the shutter system. Over time, controls can become worn, damaged, or outdated, leading to unreliable operation.
Common signs your controls may need replacing:
- Shutter not responding to commands
- Intermittent operation
- Faulty switches or buttons
- Damaged wiring or casing
- Upgrading to new control options (remote, smart, etc.)
Replacing the controls can improve reliability, usability, and safety, and in some cases allow you to upgrade how the shutter is operated.
Upgrading Shutter Controls
1. Types of Roller Shutter Controls
1. Types of Roller Shutter Controls
There are several types of controls available depending on the shutter type and application.
Key Switch Controls
- Operated using a key
- Common on external shutters
- Provides controlled access
Rocker / Toggle Switch
- Standard up and down switch
- Simple and cost-effective
- Common on internal shutters
Push Button Stations
- Typically used on industrial doors
- Separate buttons for up, down, and stop
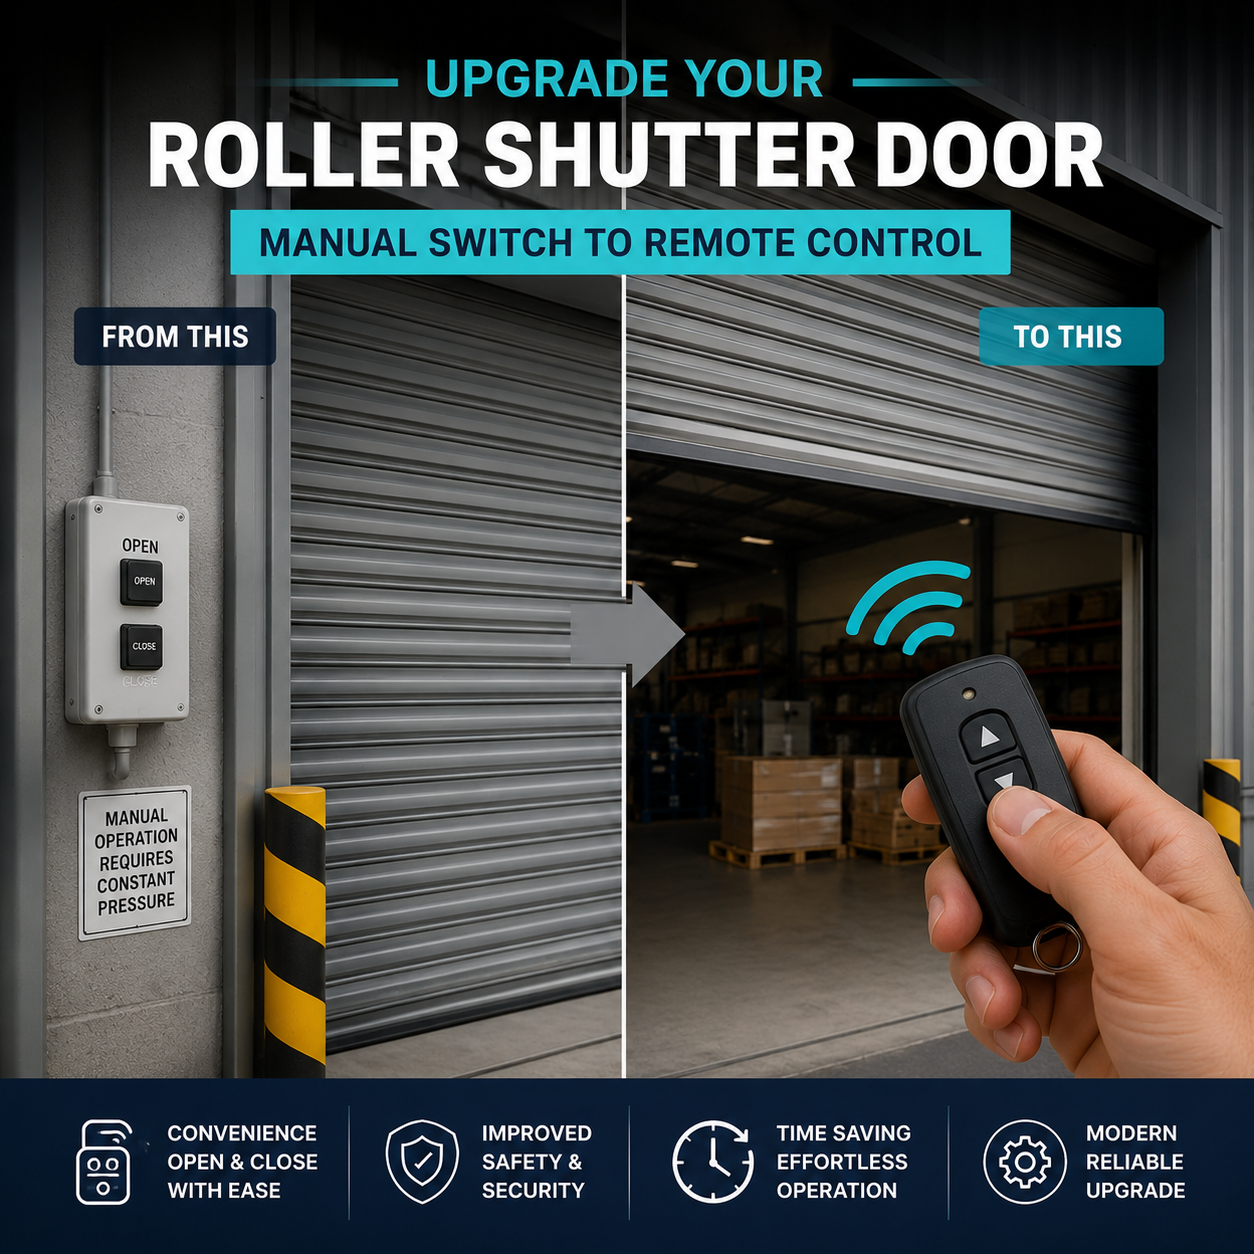
Remote Control Systems
- Operate shutters wirelessly
- Ideal for convenience and access
Smart / Automated Controls
- Smartphone operation
- Integration with building systems
- Timers and automatic opening/closing
2. Matching the Correct Control (Very Important)
2. Matching the Correct Control (Very Important)
When replacing controls, it is important to ensure compatibility with the existing system.
This includes:
- Motor type (tube motor or industrial motor)
- Voltage (usually 240V or 415V)
- Control panel or receiver typeSafety
- systems connected (edges, sensors, etc.)
Using the wrong control can:
Always match like for like, or confirm compatibility before upgrading.
3. Can You Upgrade Your Controls?
3. Can You Upgrade Your Controls?
Yes, in many cases controls can be upgraded.
Common upgrades include:
- Adding remote control operation
- Upgrading to key switch for security
- Integrating with access control systems
- Adding timers or automation
Upgrades can improve:
- Convenience
- Security
- Efficiency
However, compatibility with the existing motor and system must be checked.
4. Safety Features and Control Systems
4. Safety Features and Control Systems
Modern shutter controls can include important safety features.
Common safety options:
- Safety edges (stop on contact)
- Light curtains (detect obstruction)
- Emergency stop buttons
- Manual override systems
When replacing controls, ensure all safety devices:
- Remain connected
- Function correctly
- Are not bypassed
Safety should never be compromised.
5. Information We Need to Supply the Correct Controls
5. Information We Need to Supply the Correct Controls
To help us provide the correct replacement controls, we will need:
- Photos of the existing control unit
- Type of motor (tube or industrial)
- Voltage (single phase or three phase)
- Description of the issue
- Any additional features required (remote, timers, etc.)
This ensures compatibility and avoids installation issues.
6. Step-by-Step Guide to Replacing Roller Shutter Controls
6. Step-by-Step Guide to Replacing Roller Shutter Controls
Replacing shutter controls involves electrical work. If you are unsure, we recommend using a qualified installer.
Step 1: Isolate the Power Supply
- Turn off and isolate the power
- Ensure the system cannot be operated
- Confirm safe working conditions
Step 2: Identify the Existing Control Setup
- Take photos of wiring and connections
- Note control type and layout
- Label wires if needed
This will help ensure correct reconnection later.
Step 3: Remove the Existing Control Unit
- Unscrew and remove the control panel or switch
- Carefully disconnect wiring
- Keep note of terminal connections
Step 4: Check Wiring and Components
- Inspect wiring for damage
- Check connections are in good condition
- Replace any worn or faulty cables if required
Step 5: Install the New Control Unit
- Mount the new control in position
- Ensure it is securely fixed
- Confirm correct orientation and accessibility
Step 6: Reconnect Wiring
- Connect wires according to the wiring diagram
- Match connections to the original setup
- Ensure all terminals are secure
Incorrect wiring can damage the motor or controls.
Step 7: Reconnect Safety Devices
- Reconnect safety edges, sensors, or stops
- Ensure all safety features are active
Never bypass safety systems.
Step 8: Restore Power Supply
- Reconnect power
- Ensure safe conditions before testing
Step 9: Test Operation
- Test open and close functions
- Check stop function works correctly
- Confirm smooth and responsive operation
Also check:
- Safety features activate correctly
- Remote or automation functions (if fitted)
Step 10: Final Checks
- Ensure all fixings are secure
- Confirm wiring is safe and enclosed
- Check control unit is functioning correctly
- Ensure shutter operates as expected
7. Technical Information
7. Technical Information
Compatibility and Electrical Requirements
Controls must match:
- Motor type and rating
- Voltage supply
- Control system configuration
Incorrect controls can lead to:
- System failure
- Electrical faults
- Safety risksControl System Integration
Controls may be integrated with:
- Fire alarm systems (fire shutters)
- Access control systems
- Automation systems
- Ensure compatibility when replacing or upgrading.
Installation Considerations
- Controls must be installed in a safe, accessible location
- Wiring must comply with electrical regulations
- Protection from weather may be required for external installations
When to Replace the Full Control System
Consider replacing the full system if:
- Controls are outdated or
- obsoleteUpgrading to automation or remote operation
- Multiple components are failing
A full upgrade can improve performance and reliability.
Shop Our Roller Shutter Controls

Industrial Roller Door Upgrade Kit
Choose your option


