When it comes to installing roller shutters, choosing the right fixing method is crucial for both the functionality and aesthetics of the shutter. Two common installation methods are face fixing and reveal fixing. Understanding the difference between these methods can help you make an informed decision that best suits your needs and preferences.
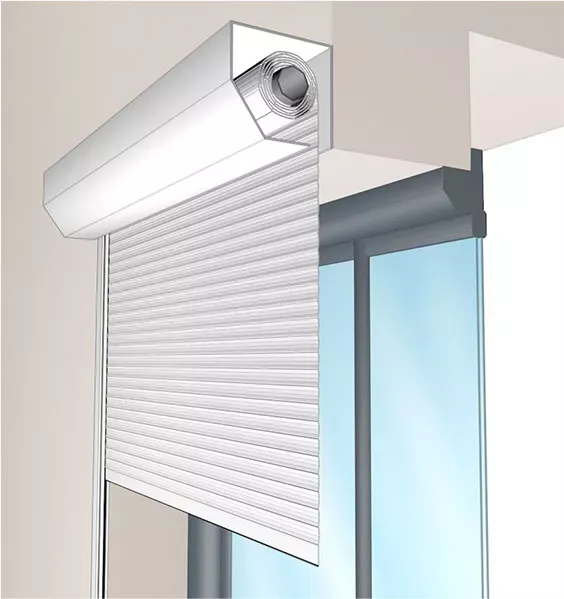
Face fixing involves mounting the roller shutter directly onto the face of the opening or wall. The shutter is made bigger than the opening, so its fitted above and around the opening. This is the most common option when you have unlimited space above and down the sides of the opening.
Easy Installation: Face fixing is generally straightforward, making it a quicker and less complicated installation process.
Maximizes Opening Size: Since the shutter is mounted on the exterior, it does not reduce the size of the opening.
Versatility: Ideal for situations where the opening is not suitable for reveal fixing.
Headroom: Ensure you have enough head room above the opening for the shutter box.
Sides: Ensure you have enough room down each side of the opening for the guide rails.
Projection: As the shutter box is sticking out from the wall, ensure there are no obstructions.
Shutter Height Calculation: Measure the height of the opening from Lintel to Floor/Cill, across the LHS, Middle and RHS. Take the largest dimension and add the shutter box size and bottom slat size. Example; 1000mm high opening + 50mm Bottom Slat + 165mm Shutter Box = 1215mm O/A Product Height.
Shutter Width Calculation: Measure the width of the structural opening (Brick to Brick), across the Top, Middle and Bottom. Take the largest dimension and add the shutter guide rail each side. Example; 1000mm wide opening + 60mm LH GUide + 60mm RH Guide = 1120mm O/A Product Width.
Imagine a roller shutter mounted directly onto the wall, with the box fitted above the opening and guides down the outside of the opening.
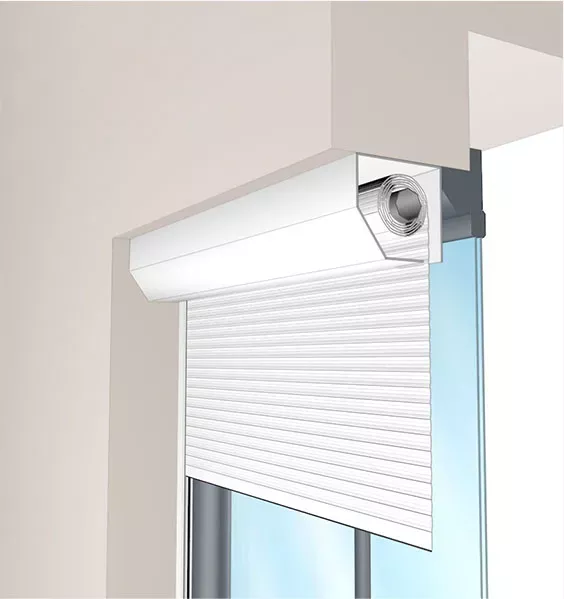
Reveal fixing involves installing the roller shutter within the opening, with the shutter box under the lintel. The side tracks run down the inside of the recess in line with the window/door frame. This is common when there is not enough headroom for the shutter box. The downside to this option is that it reduces the size of your opening, width and height.
Aesthetically Pleasing: The shutter fits neatly within the opening, providing a cleaner, more integrated look.
Space-Efficient: Does not protrude into the room or external space, making it ideal for areas where space is a premium.
Enhanced Security: Fitting the shutter within the reveal can offer slightly better protection against forced entry, as there are fewer leverage points.
Opening: Ensure the shutter box inside the recess will not prevent the door/window from opening.
Projection: Measure the depth of your recess, as the shutter box may protrude past the recess.
Shutter Height Calculation: Measure the height of the opening from Lintel to Floor/Cill, across the LHS, Middle and RHS. Take the SMALLEST dimension and take 5mm off the opening size to provide you overall product height. Example; 1000mm high opening - 5mm Tolerance = 995mm O/A Product Height.
Clear Opening Height Calculation: Take the Overall Product Height dimension and take off the Box Height and Bottom Slat height. Example; 1000mm O/A Shutter Height - 165mm Shutter Box - 50mm Bottom Slat Hangdown = 785mm Clear Opening Height.
Shutter Width Calculation: Measure the width of the structural opening (Brick to Brick), across the Top, Middle and Bottom. Take the SMALLEST dimension and take off 5mm off the opening size to provide the overall product width. Example; 1000mm wide opening - 5mm = 995mm O/A Product Width.
Clear Opening Width Calculation: Take the Overall Product Width dimension and take off the width of each guide rail down each side. Example; 1000mm O/A Shutter Width - 60mm LH Guide - 60mm RH Guide = 880mm Clear Opening Width.
Visualise a roller shutter installed within the confines of a window or door frame, with the guides and box tucked neatly into the sides and top of the opening, respectively, making the installation less obtrusive and more harmoniously integrated into the building's architecture.
Choosing between face fixing and reveal fixing for your roller shutter installation depends on several factors, including the structure of your opening, aesthetic preferences, and security considerations. While face fixing offers ease of installation and versatility, reveal fixing provides a more integrated look and can enhance the aesthetic appeal of your property. By understanding the differences between these two methods, you can make a choice that aligns with your needs and enhances the functionality and appearance of your roller shutters.
For further assistance and to ensure your roller shutters are installed to perfection, consider consulting with our experts. We're here to help you every step of the way, from selection to installation.